ArbiHunt watches 26 exchanges, prices around 15,000 markets per cycle and refreshes roughly every 30 seconds. Every row that reaches the board already makes money after trading fees, slippage and the exchange withdrawal fee. That still leaves a lot that is not yours to trade: routes through venues where you hold no account, transfers over a chain you would rather not use, and trades too small to be worth the effort.
Filters turn the board into your own. This guide covers each control and exactly what it hides, then works through three setups with the arithmetic behind them.
Where the filters live, and who gets them
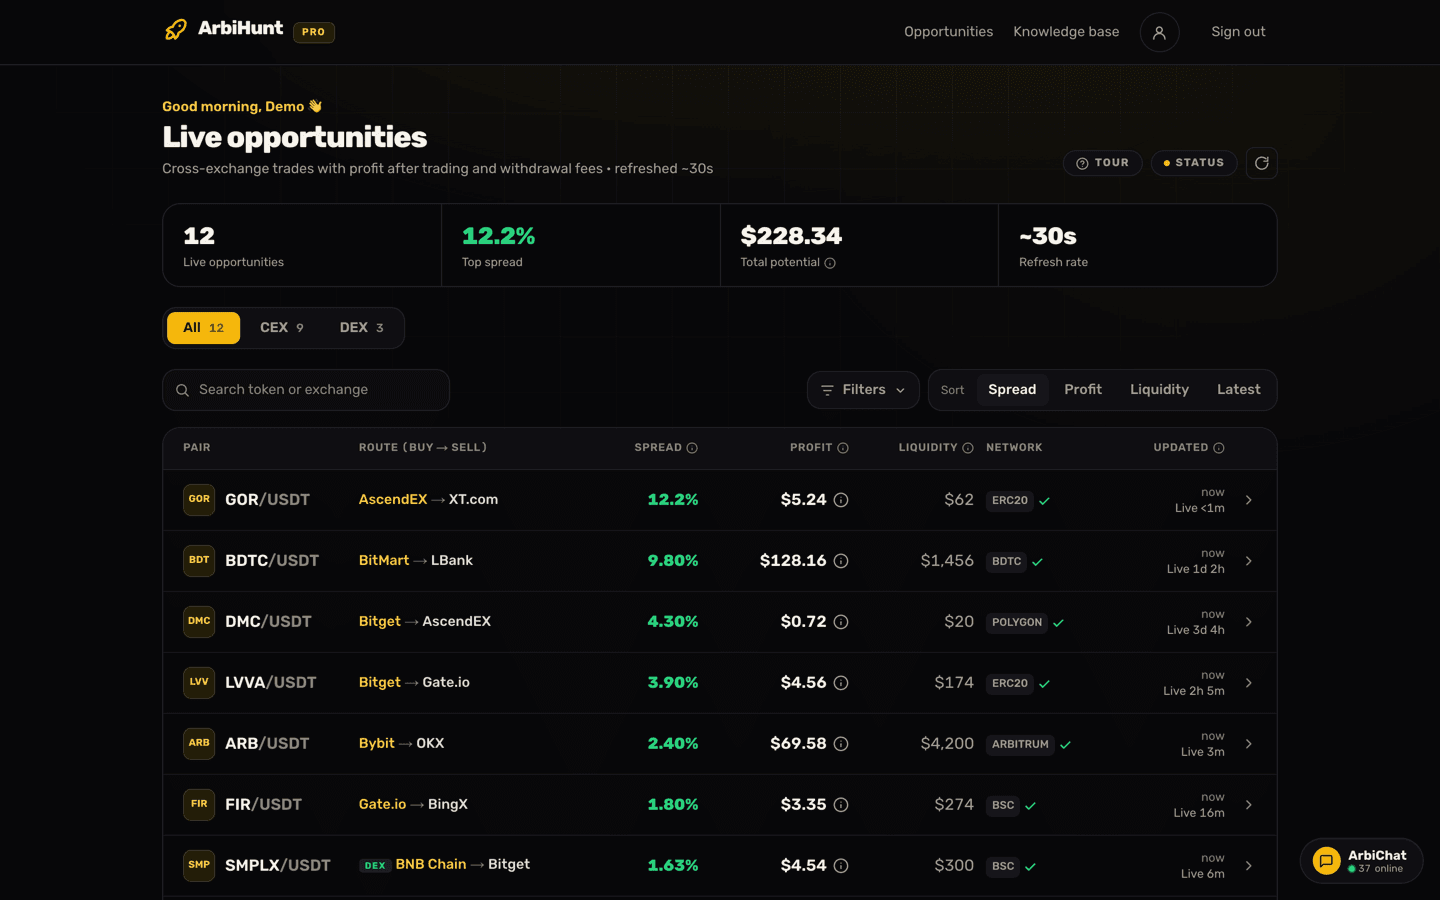
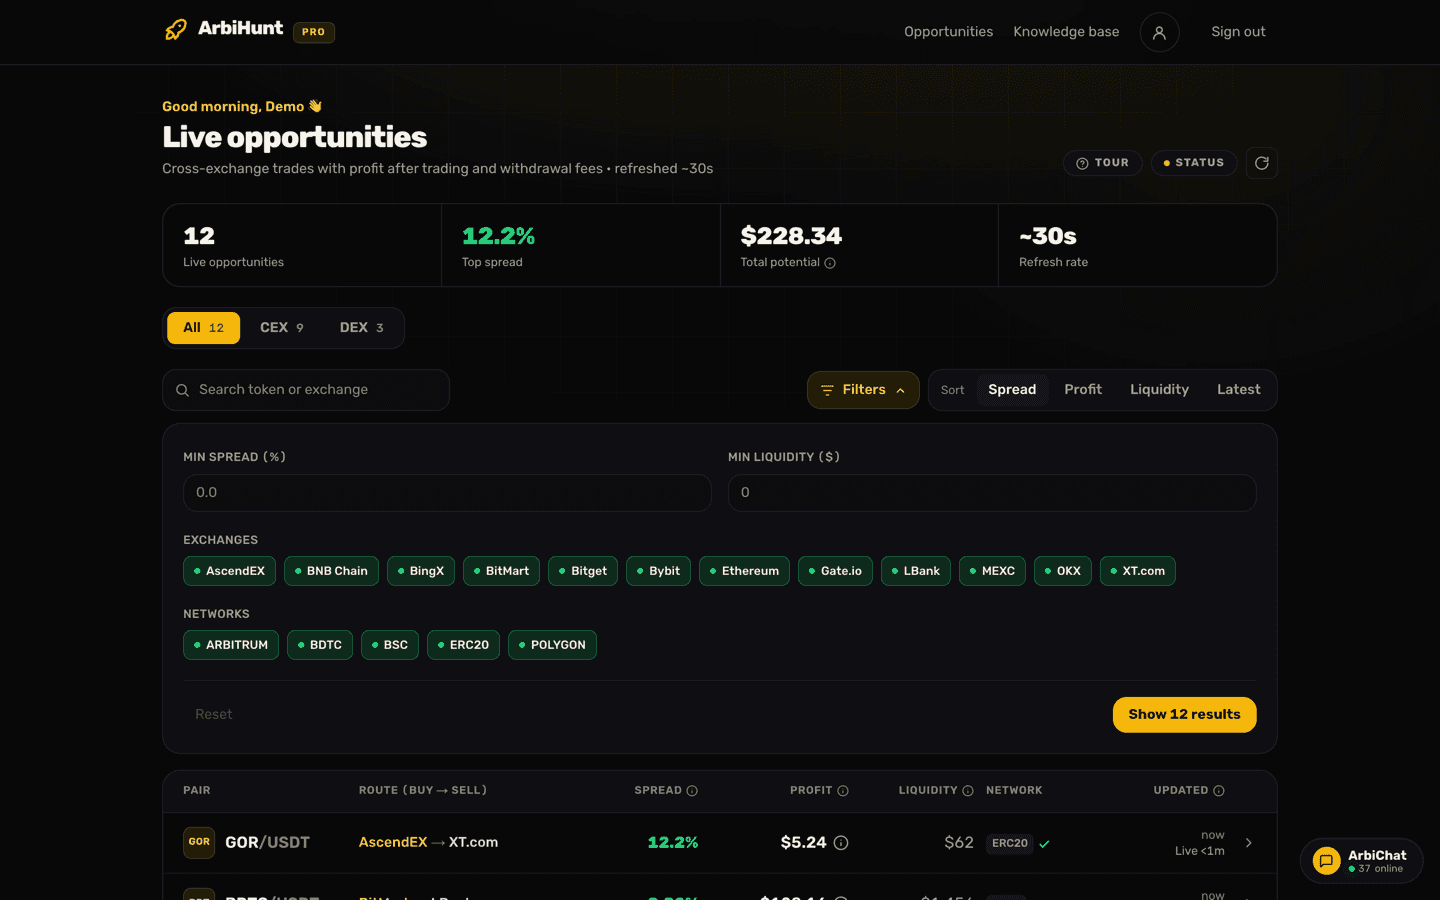
The toolbar sits between the KPI strip and the table: a search box on the left, the Filters button and the Sort control on the right. Opening Filters drops a panel with four controls. There is no Apply button. It filters as you type and keeps re-applying itself every time prices refresh, so you set it once and leave it. Close it by clicking outside, pressing Escape, or hitting the gold Show N results button, which tells you the match count before you commit to it.
Filters and sort are both PRO features. On a free account, tapping Filters opens this instead:
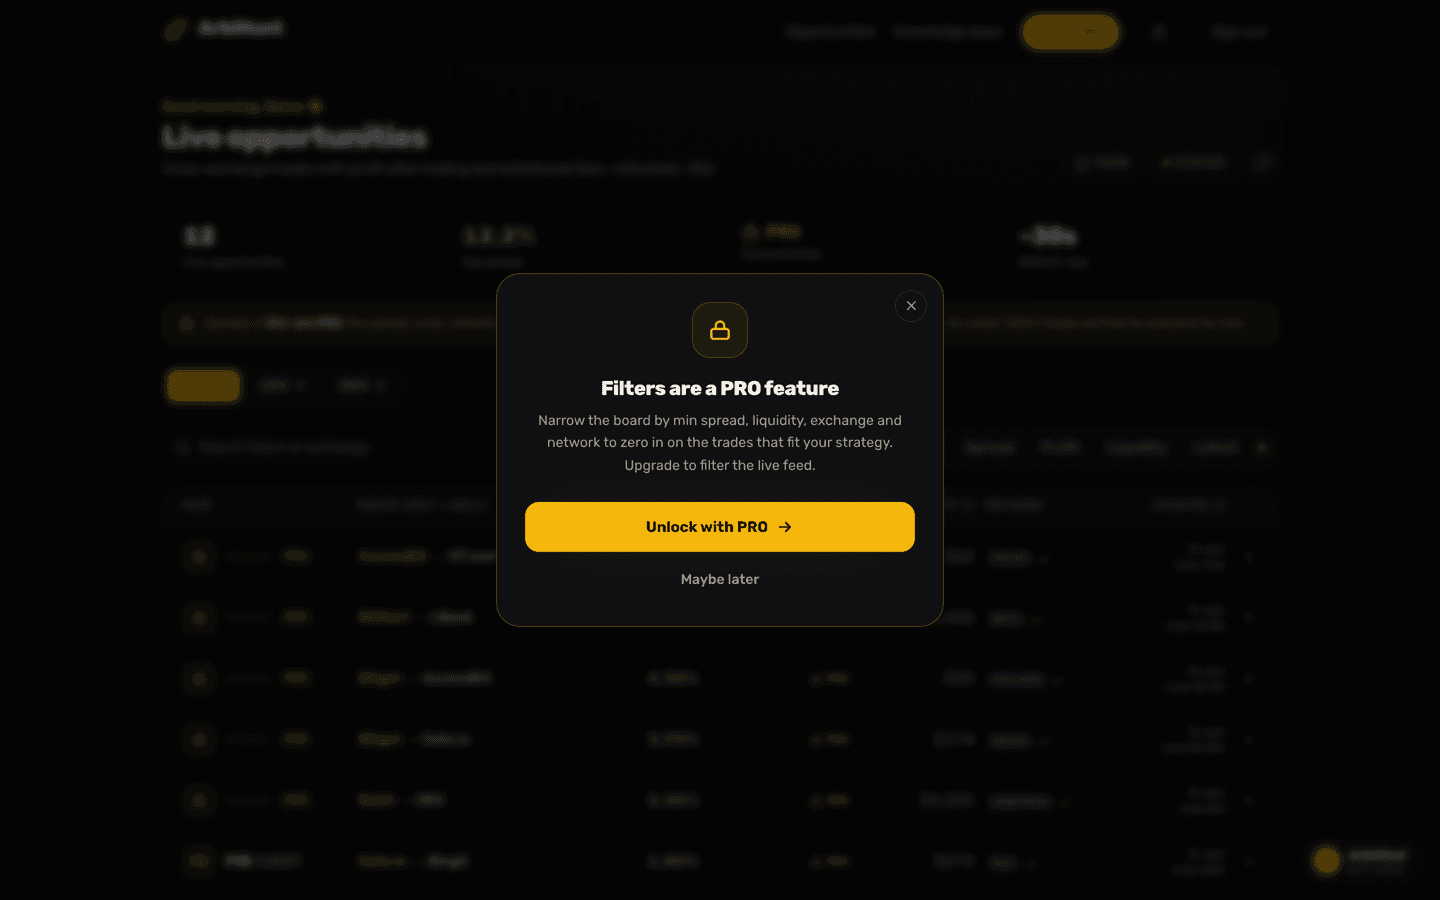
A free account is not left with nothing, though. The search box is open to everyone and matches a token or an exchange name, and the board opens ranked by spread, high to low, for free and PRO alike, so the default view is already the useful one. Free accounts are also served a deeper board than PRO ones, up to 200 rows rather than 100, so the locked rows ranked in among them do not push the ones you can open off the end of the list. One quirk: a masked PRO row can never match a token search, because the coin name never reaches your browser, though it still matches on either of its exchange names, which stay readable. So a token search that comes back empty offers an unlock rather than pretending the coin does not exist. Full comparison: Free vs PRO.
The four controls, and what each one hides
Min spread (%)
Type a number and every row whose Spread is below it disappears. Leave it blank, or set it to 0, and it does nothing. It reads the same percentage the Spread column prints, so what you type and what you see are always the same number.
That percentage is the spread: the raw gap between the lowest ask on the buy exchange and the highest bid on the sell exchange, before any cost. Trading fees on both legs, slippage and the exchange withdrawal fee all come out of it, so a spread floor says nothing on its own about what a row pays. The Profit column does: it is after every one of those costs, and a trade that loses money after them is never listed in the first place.
Use it to set a floor, not to chase a ceiling. The board is already sorted by spread, so the widest gaps are on screen whether you filter or not, and the widest are often the thinnest books. A floor earns its place as margin: a 1% gap can absorb a price move between the check and your fill that a 0.5% gap cannot. It works best paired with a liquidity floor, as Recipe 2 shows.
Min liquidity ($)
The dollar depth in the order books behind the opportunity: what the thinner side holds near its best price. Rows holding less than the number you type disappear. This is the most useful control on the panel for clearing out books too thin to trade, but it is not the size the profit is measured at. That is the row's trade size, the amount the profit was priced at: on an exchange route, how much the two books can match before the price gap, after trading fees, closes. It is often much smaller than the liquidity, and now and then larger. PRO members see it as the first line of the (i) beside the profit; the detail screen of an on-chain row and the app's Capital figure show it too.
Exchanges
A chip for every venue on the board you have loaded, alphabetical, all switched on. On-chain routes add their chain as a chip too, such as BNB Chain or Ethereum. Switch one off and any row using that venue on either leg vanishes. That "either leg" behaviour is the whole trick: an arbitrage route needs a buy venue and a sell venue, so switching off everything except your own exchanges leaves only routes where both ends are yours.
The chip list comes from the live board, not the full exchange roster. A venue with nothing live right now has no chip, and neither does one paused on purpose. If a venue you expect is missing, the status page says whether it is paused and why.
Networks
A chip for every transfer network in the current board, alphabetical, all on. Switch one off and rows that would transfer over that chain disappear. The chip is the network the row's profit was worked out on: the cheapest one open for withdrawals on the buy exchange and deposits on the sell exchange, which is also the first network the row lists.
Expect unfamiliar names. In the panel at the top of this page, alongside ARBITRUM, BSC, ERC20 and POLYGON sits a chip reading BDTC. The label is simply whatever the withdrawing exchange calls that coin's transfer route, so a ticker-shaped name is normal for the micro-caps arbitrage lives on, and a good reason to read Choosing the right network for a transfer before deciding which chips to keep.
The badge on the Filters button counts every one of these individually. Switch off eight exchanges and one network with a liquidity floor set, and the badge reads 10 and the clear button becomes Reset (10). It counts decisions, not categories.
Filters narrow the board you loaded, not the whole market
The "Live opportunities" tile counts the whole market. The table is capped: the 100 widest-spread rows on PRO, 200 on free. So on a busy day the tile can read higher than any filter setting can produce. Nothing is broken. You are filtering the top of the board, which is the part you would trade anyway.
Sort re-ranks the board, it does not narrow it
Sort offers Spread, Profit, Liquidity and Latest, each ranked high to low, and it is PRO-gated the same way filters are. Every account opens on Spread.
Profit ranks by the dollar figure after every fee, the honest ordering once you care about what a trade pays rather than how wide its gap is: a 4.30% spread on $20 of depth sits below a 2.40% spread on $4,200 of it. Liquidity finds the rows that can absorb real money. Latest ranks by when each row was last verified against the order books, for when freshness matters more than size. The columns behind all four are explained in How to read the ArbiHunt dashboard.
Recipe 1: "I only have accounts on four venues"
The biggest single time-saver on the panel, and the reason is arithmetic. Across 26 exchanges there are 650 possible buy-to-sell routes. Across four there are twelve. Filtering to your own venues throws away more than 98 routes in every 100, and every one of them was unreachable today anyway: KYC and funding on a new exchange take far longer than a price gap lives.
| Control | Setting |
|---|---|
| Min spread | Leave blank |
| Min liquidity | Leave blank for now |
| Exchanges | Switch off everything except your four |
| Networks | All on |
No spread floor is needed here. Every listed row already pays after the withdrawal fee at its size, so the floor would only hide small winners you may still want to see. With the twelve chips in the panel at the top of this page, you would switch off eight and the badge would read 8.
Then expect a thin board, sometimes an empty one. That is the correct result, not a fault: when nothing matches, the table reads "No live opportunities right now. We only list trades that still make money after the withdrawal fee, so quiet spells happen. Check back shortly." With filters active, that means your filters, not the market.
The fix for a permanently empty board is not a looser filter, it is another funded account. Which venues are worth adding is covered in Setting up your exchange accounts.
Recipe 2: "Only trades worth at least $5"
The direct way needs no filter at all: Sort by Profit. The dollar figure on every row is already after every fee the row carries, so the rows worth $5 or more are at the top, and you stop reading when the profit drops under $5.
Filters cannot set a floor on the profit itself, but a floor on both spread and liquidity is a rough first cut:
| Control | Setting |
|---|---|
| Min spread | 1 |
| Min liquidity | 1000 |
| Exchanges | Your funded venues |
| Networks | All on |
That is not a guarantee of $5. A 1% spread on $1,000 is $10 of gap, and taker fees at 0.1% a leg take about $2 of it, which leaves about $8 before the withdrawal fee. But the profit is earned on the row's trade size, not its liquidity, and the trade size is often much smaller: a row showing $1,000 of liquidity at a 1% spread can be a $400 trade that pays $2 once the withdrawal fee is out. What the two floors do give you is a margin and a book worth checking. The Profit column says what each row actually pays.
Even a row that pays $5 pays it only at its own trade size. Most people should trade less: the books are a snapshot from seconds ago, and a common rule is to size at about a quarter of the trade. The catch is that the withdrawal fee does not shrink with your trade. It is a flat number of coins, so a smaller trade keeps much less than a proportional share of the profit.
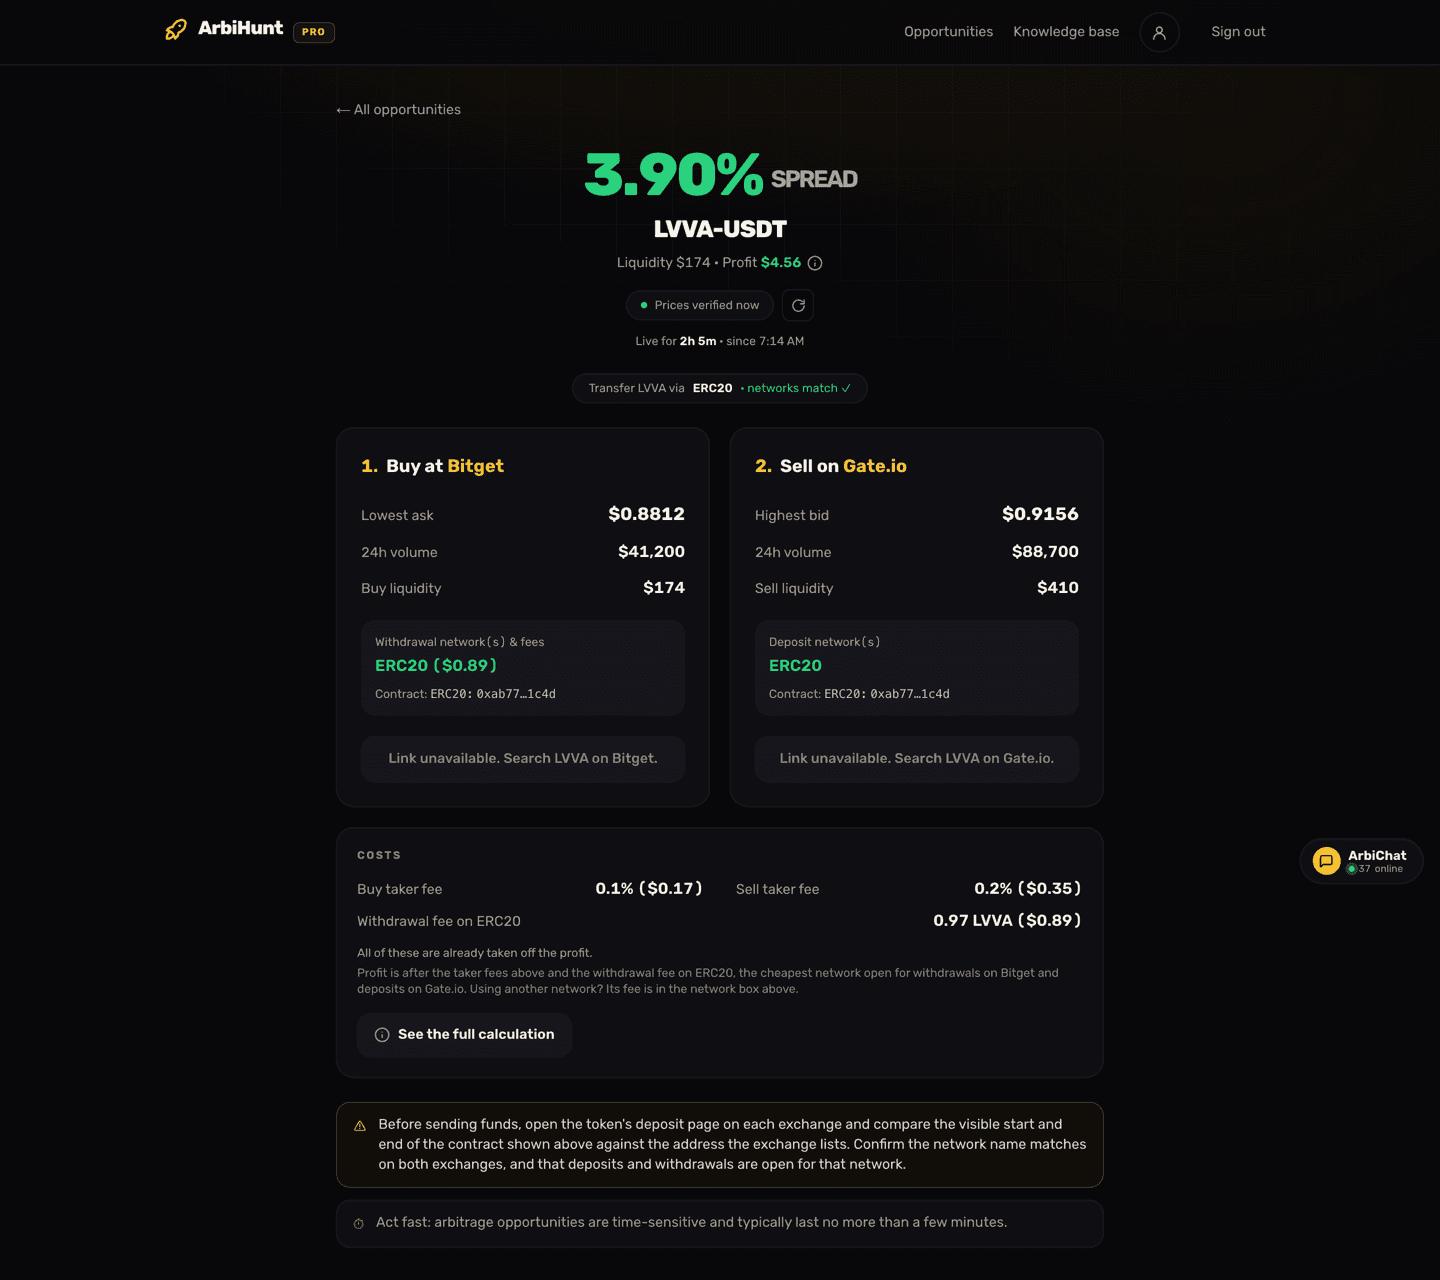
Take LVVA from the calculation below: a row with a 3.90% spread, whose calculation shows $4.56 of profit on a $168.03 trade, with a $0.89 withdrawal fee inside it. Trade a quarter of that, about $42, and you keep roughly $0.47, not the $1.14 a quarter of the profit suggests, because the whole $0.89 still leaves with the coins.
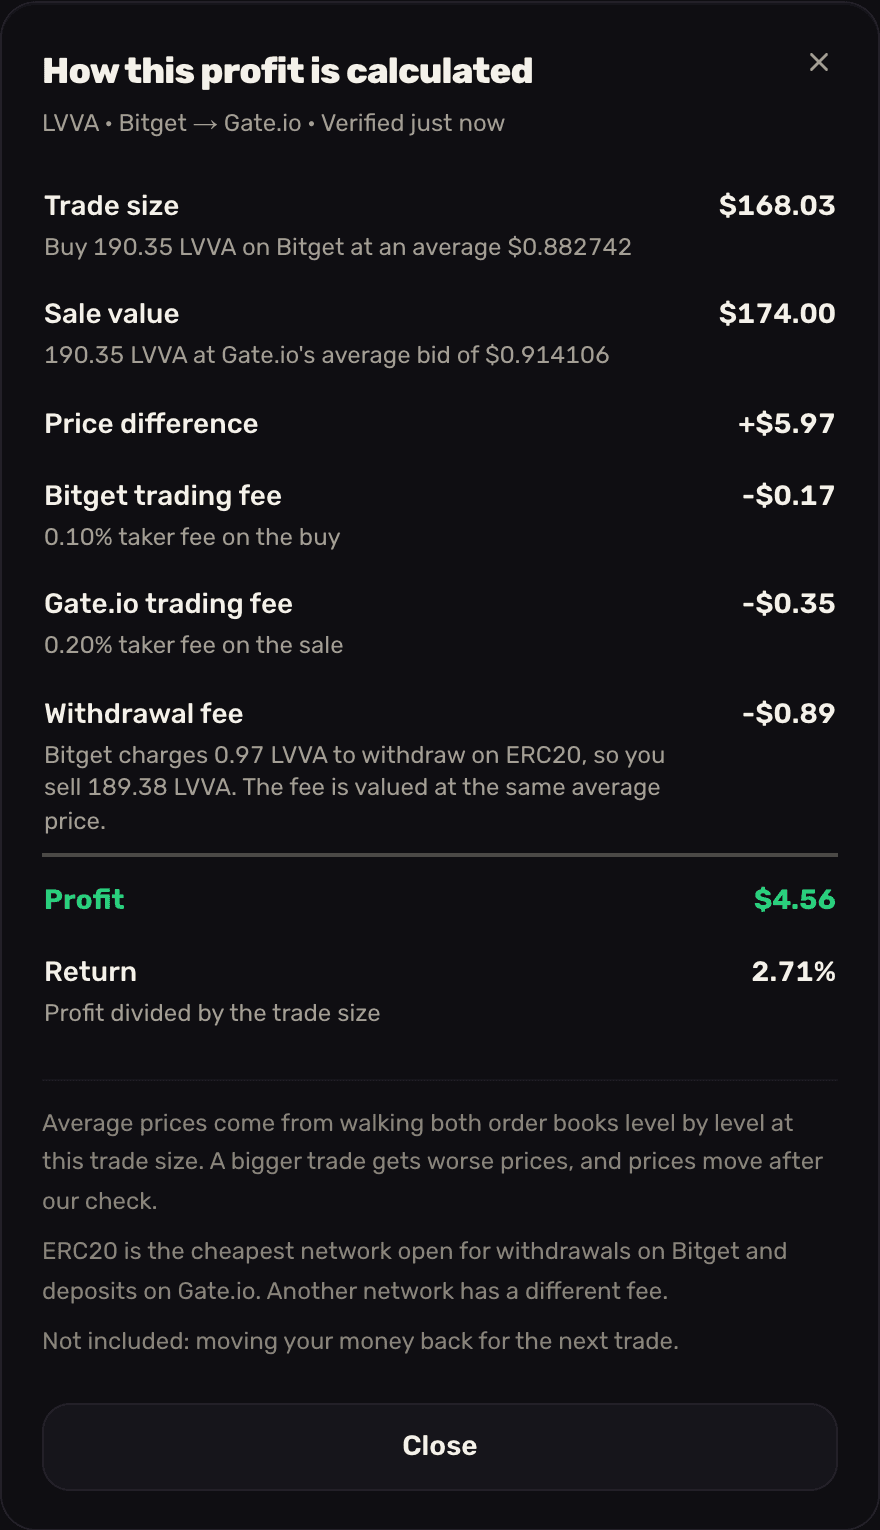
The rule of thumb for your own size: your profit is about the row's profit before the withdrawal fee, scaled to your share of the trade, minus the whole withdrawal fee. For LVVA at a quarter size: $4.56 + $0.89 = $5.45 before the fee, a quarter of that is $1.36, and taking off the whole $0.89 leaves $0.47. It is a slight underestimate, because a smaller trade also gets slightly better average prices from the book.
Run it backwards. To keep $5 on a quarter-size trade of a row with a 1% spread and a $1 withdrawal fee: taker fees at 0.1% a leg leave about 0.8% of your position before the withdrawal fee, and the whole $1 comes off your quarter. So 0.8% of your position has to be $6, a position of $750, and the row's trade size has to be about $3,000, more in practice, since a real order walks past the best prices the spread is measured at. Liquidity cannot promise that, because the trade size is often far below it. Raising Min liquidity to 3000 is still a sensible first cut, since it hides most books too thin for such a trade, but only the trade size in the (i) says whether a row is big enough.
PRO members get the trade size and the withdrawal fee in dollars from the (i). On a free account the detail screen shows the spread, both taker fees and the withdrawal fee in coins. The arbitrage calculator runs the same sum on your own numbers, including the breakeven spread for a given size.
Depth on screen is a snapshot, not a reservation
Liquidity is what the books held at the last check, seconds ago. Nobody is holding it for you, and a filter that says $3,000 does not guarantee $3,000 will be there when your sell order lands. Size under the number, not at it.
Recipe 3: "I only transfer on networks I trust"
You do not need the network chips to avoid expensive chains. The withdrawal fee on the cheapest network open on both sides is already taken off every profit, so a row routed over a pricey chain either still pays after that fee or is not on the board at all.
What the chips are for is chains you will not use: one whose confirmation times you do not know, one your receiving exchange credits slowly, or one you simply have no experience sending on. Switch those off, and keep the ones you are comfortable with.
| Control | Setting |
|---|---|
| Min spread | As in Recipe 2 |
| Min liquidity | As in Recipe 2 |
| Exchanges | Your funded venues |
| Networks | Off for chains you will not send on |
One thing to know before you switch a chip off. A row is filed under the one network its profit was worked out on, so switching that chain off hides the row even when a second network on the same route would also work. And if you do send on a different network from the one the row names, its fee is different too: every network's fee sits in the withdrawal network(s) box on the buy leg of the detail screen. Take the difference between that fee and the one in the row's calculation off the profit yourself.
Build your own board
PRO unlocks filters and sorting across the live feed, every trade with a spread of 2% or more, and the profit in dollars on each row with its step-by-step calculation.
What filters cannot do for you
A filter is a way of not looking at things. It makes no claim at all about the rows that survive it.
- A network chip is not a compatibility check. A chain appearing in the list does not confirm both exchanges support it for that coin, or that deposits and withdrawals are open on it right now. The green check on the row and the "networks match" pill on the detail screen are the signals to read; the exchange's own deposit page is the final word.
- A ticker is not a token. Two exchanges can list unrelated assets under the same symbol. Compare the contract address on both legs before anything moves.
- A fresh filter is not a fresh price. The board is a snapshot taken seconds ago. Re-check both exchanges in the last seconds before you place the buy.
- A fee we could not confirm is not in the profit. When an exchange gives no withdrawal fee we can trust, nothing is deducted for it, and the detail screen and the calculation say so. Check that fee on the exchange and take it off yourself.
Filters cut the list down to candidates. Turning a candidate into a trade is the checklist in How to execute an arbitrage trade, step by step.
None of this is financial advice. ArbiHunt is an information tool: it finds, prices and ranks opportunities, but it never connects to your exchange accounts, never holds funds and never places a trade. Arbitrage carries real risk, prices move in seconds, and a row on the board may not be executable by the time you reach it.
See it live
ArbiHunt scans 26 exchanges in real time and ranks every spread by true net profit, after fees, withdrawals and live liquidity.