Move a coin off an exchange and the exchange charges a withdrawal fee: a flat amount, denominated in the coin, set separately for every blockchain network that coin can travel on. It is not a percentage of what you send.
That one property explains almost everything about how withdrawal fees behave in arbitrage. A flat fee is rounding error on a large position and a death sentence on a small one, and nothing about the coin, the spread or your timing changes that. It is the cost that decides whether a small trade was ever worth placing.
What you are actually paying for
Three things exchange interfaces tend to blur together:
- The exchange sets the fee, not the blockchain. The venue batches withdrawals, pays the chain's real gas cost, and charges a flat amount covering that gas plus a margin. The margin is a business decision, so the published fee often sits well above the on-chain cost, and the same coin on the same network can cost several times more to withdraw from one venue than another.
- It is priced per network. One coin on five chains is five different fees. The fee schedule is a table, not a number, and the cheap row is not always a row your two exchanges can both use.
- It is deducted from the amount you send. Withdraw 500 USDT with a 1 USDT fee and 499 USDT lands on the other side. Your sell leg is smaller than your buy leg, so the fee is a haircut on the position, not a separate invoice.
Deposits are the easy half: the receiving exchange normally credits whatever arrives for free, because the cost of getting it there was paid on the sending side. Working rule: the transfer cost of a cross-exchange arbitrage trade is the sending exchange's withdrawal fee, and nothing else.
Why the same $1 fee is noise at $5,000 and fatal at $100
Because the fee is flat, its bite is decided entirely by your position size. Here is one trade, held constant, run at five sizes.
The setup. You buy at $1.000 and sell at $1.015, a 1.50% gross spread. Taker fees are 0.1% on each leg, the standard round trip for arbitrage since both legs cross the spread. The transfer costs a flat $1.00.
| Trade size | Net profit | Net as % of size | Spread needed to break even |
|---|---|---|---|
| $100 | $0.30 | 0.30% | 1.20% |
| $250 | $2.24 | 0.90% | 0.60% |
| $500 | $5.49 | 1.10% | 0.40% |
| $1,000 | $11.97 | 1.20% | 0.30% |
| $5,000 | $63.86 | 1.28% | 0.22% |
Read the middle column top to bottom. The gross gap is 1.50% in every row, but at $100 you keep a fifth of it and at $5,000 you keep six-sevenths. The dollar you pay to move the coin is 1.00% of a $100 position and 0.02% of a $5,000 one.
Read the right-hand column and it gets sharper. At $100 that trade needs a 1.20% spread just to return your money, and typical spreads on liquid pairs do not clear that. At $5,000 it needs 0.22%. Same coin, same fees, same market: the flat fee quietly rewrote the entry bar by a factor of five.
The curve is steep at the bottom and almost flat at the top. Below roughly a few hundred dollars the withdrawal fee is the trade, and the spread is a detail. Above a few thousand, the fee stops mattering and your real limits become order-book depth, slippage, and whether the gap survives the transfer.
The break-even you can work out in ten seconds
Two versions of the same question, and you want both in your head.
Break-even spread, at a size you have already chosen. This is the number the free arbitrage calculator returns in its third card. Enter your prices, size, taker fees and the flat withdrawal fee, and it tells you the gross spread the trade must beat to return exactly zero.
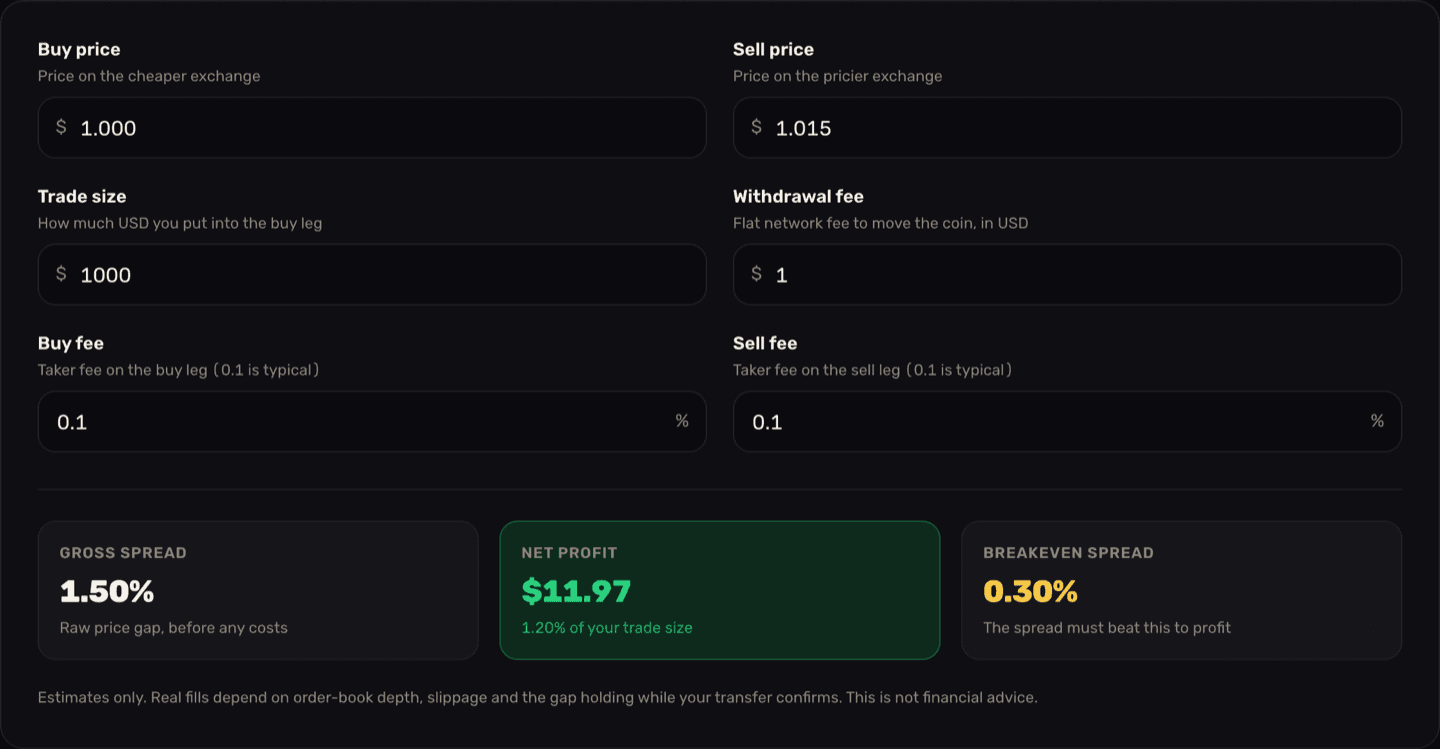
Break-even size, at a spread you have already found. Take the gross spread, subtract the trading fees on both legs, and divide the flat fee by what is left. For a 1.50% spread with 0.1% taker fees each way, roughly 1.30% survives, so:
- A $1.00 transfer needs about $77 on the table before the trade turns positive.
- A $6.00 transfer needs about $463.
That second number is the useful one. It is not the spread that made the trade unviable, it is the route. Before you get attached to a percentage, check whether the size you actually intend to trade clears the break-even for the route you would actually use. The wider walkthrough of how a headline percentage becomes a number in your pocket is in Spread vs. net profit.
Same coin, cheaper chain
Most listed tokens exist on several chains at once, and the exchange prices each route separately. The gap between the cheapest and dearest route for one coin is routinely an order of magnitude, sometimes more, and gas-priced chains move hour to hour, so the ranking is not fixed. Read the fee on the screen rather than trusting a chain's reputation.
What that does to the arithmetic, using the same 1.50% trade at $1,000:
- Over a $0.20 route: $12.77 net.
- Over a $6.00 route: $6.97 net.
Identical prices, identical taker fees, identical size, and nearly half the profit gone to a dropdown choice. In break-even terms the cheap route is viable from about $16 up, and the expensive one not until about $463.
You cannot simply pick the cheapest row, though. A network only works if it is open for withdrawals on the sending exchange and open for deposits on the receiving exchange, for that exact coin. The cheapest route that fails either test is worth nothing.
The network has to match on both ends
Send a coin over a network the destination exchange does not credit for it and the funds can be stuck or permanently lost, often with no recovery path and no support ticket that fixes it. Confirm both venues list the same network for the coin before you withdraw. The full decision process is in Choosing the right network for a transfer.
Cheap is also not the same as fast, and in arbitrage a slow chain costs you in a second currency: the spread can close while your coins sit unconfirmed. Deposit and withdrawal times covers how long each style of chain really takes to credit.
When the coin has no cheap chain
Sometimes the intersection of "withdrawals open here" and "deposits open there" comes back as exactly one network, and it is an expensive one. A token that only lives on its own layer-1, or only as an ERC-20, gives you no cheaper alternative to switch to. This is the trap that catches people who learned the "just use the cheap network" rule and stopped there.
When that happens you have three options and there is no fourth:
- Size up past the break-even, if you have the capital and the book has the depth to absorb it.
- Accept the smaller net, which is fine when the spread is wide enough to carry the fee.
- Skip it. Most of the time this is the right answer, and it costs nothing.
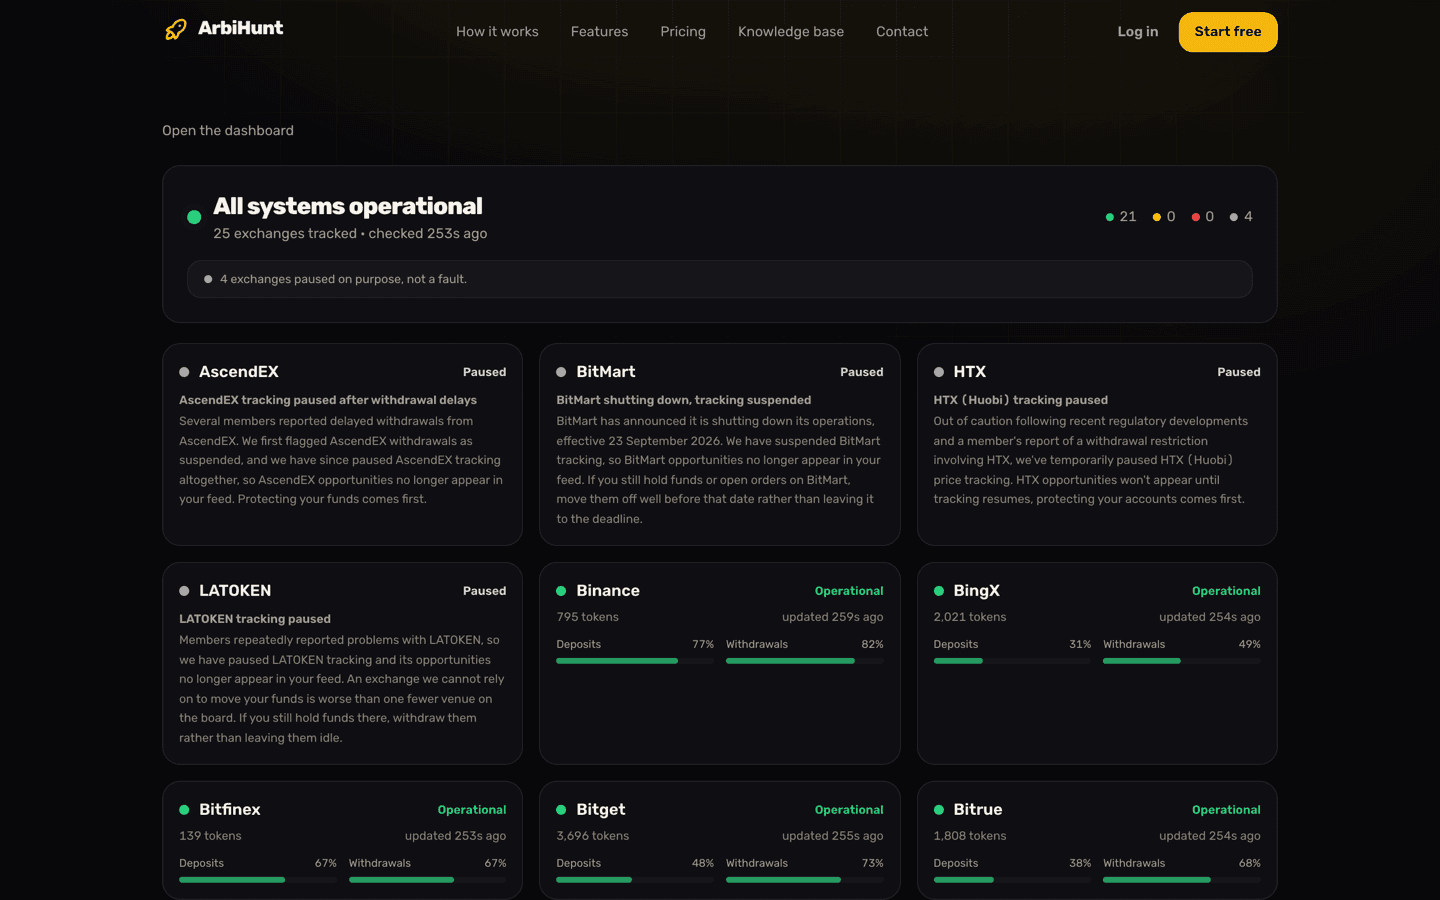
Two things make the trap worse. Gas-priced routes reprice constantly, so a fee that was tolerable yesterday can be double today. And a single shared network is a single point of failure: if that chain goes into maintenance on either venue, the trade is not executable at any size. You can see which exchanges currently have deposit or withdrawal problems, and which are paused outright, on the status page.
Where the fee shows up in ArbiHunt
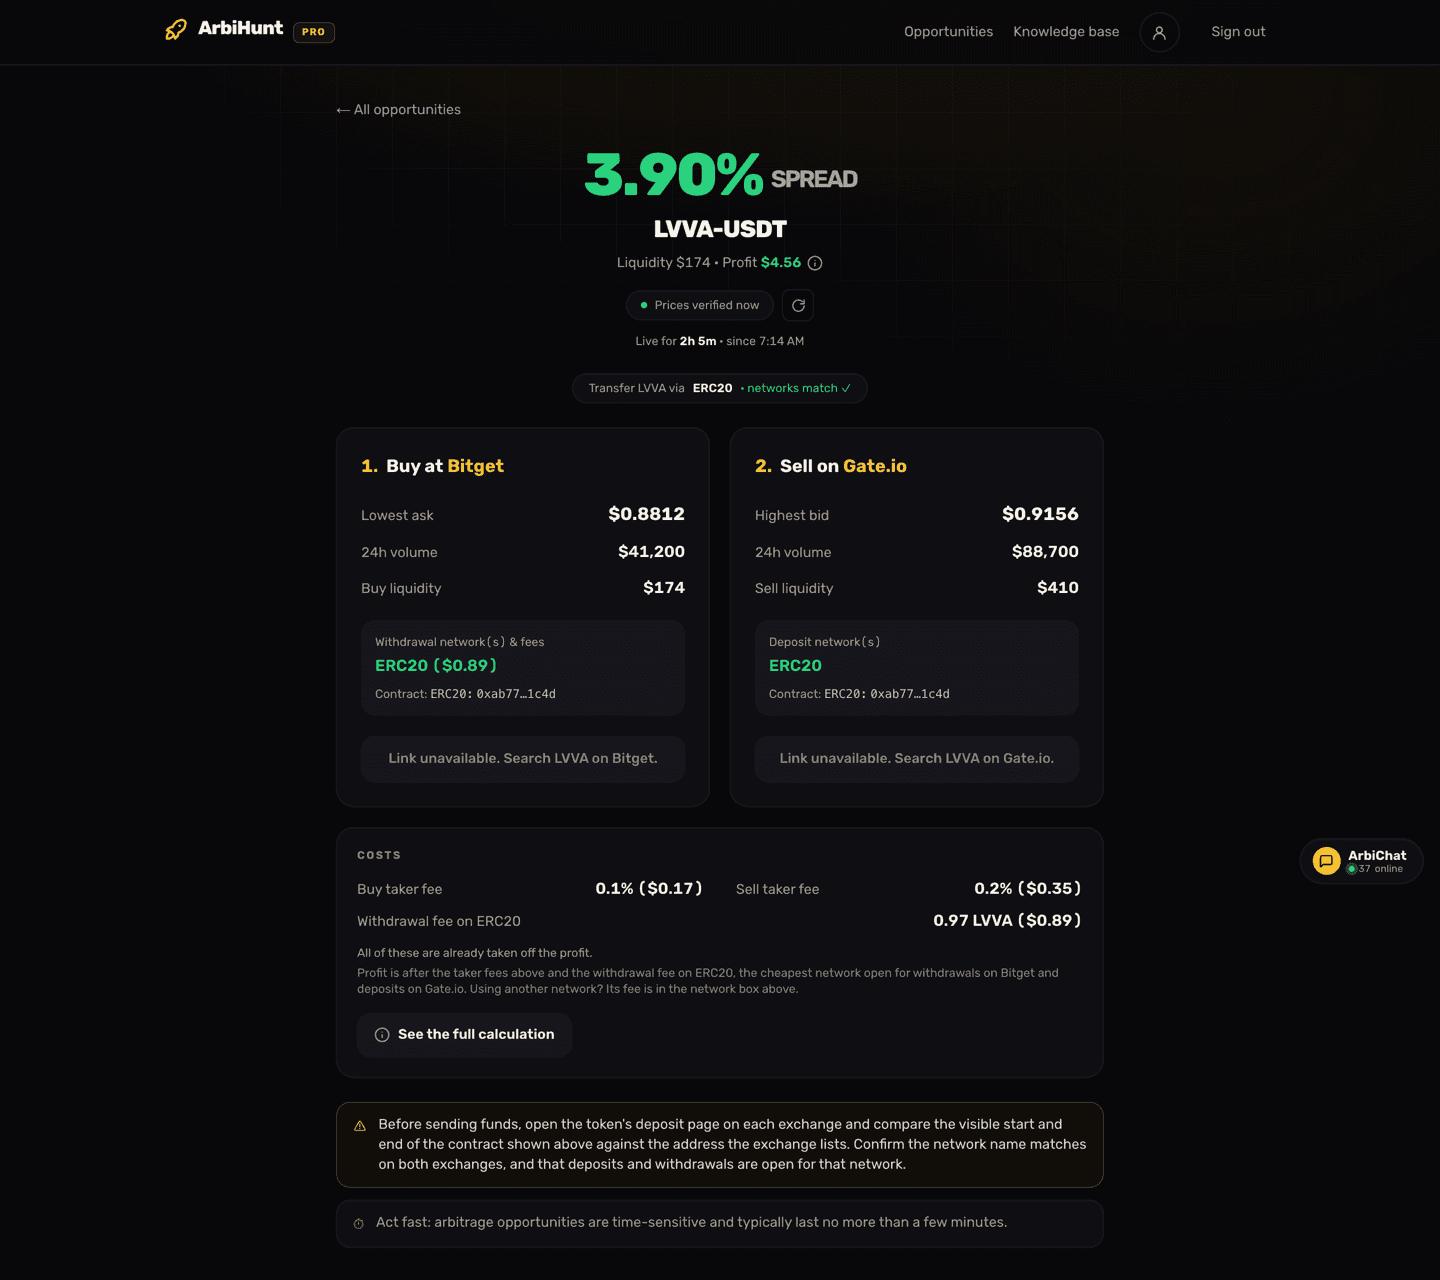
The detail screen at the top of this article is an LVVA-USDT opportunity, and it is worth walking through, because the transfer route appears in several places and each says something different.
The route pill, under the freshness chip: Transfer LVVA via ERC20 followed by a green networks match tick. That tick means the sending venue's withdrawal networks and the receiving venue's deposit networks have a chain in common. No tick, no safe transfer. The network it names is the one the profit was worked out on: the cheapest one open for withdrawals on the buy exchange and deposits on the sell exchange.
The buy leg's "Withdrawal network(s) & fees" box, here reading ERC20 ($0.89). This is the sending exchange's side. The figure in parentheses is the withdrawal fee converted to dollars, so you can compare routes without doing coin-price math in your head. When the coin can leave on more than one network, each is listed with its own fee, and the one the profit uses comes first. Where an exchange gives no fee we can confirm for a route, the network name appears without a figure. Treat a missing figure as unknown, not free, and look it up inside the exchange before you send.
The sell leg's "Deposit network(s)" box, here ERC20 with no price. The receiving exchange is not charging you; it is telling you what it will accept.
Below both legs, the Costs card lists every cost in the profit: the buy and sell taker fees, on this opportunity 0.1% and 0.2%, and a line reading Withdrawal fee on ERC20: 0.97 LVVA, with its dollar value for PRO members. And it carries the sentence that matters most on the page.
The profit already has this fee taken off
ArbiHunt's profit is after the taker fee on both legs, the slippage of walking both order books at the trade size, and the withdrawal fee on the cheapest network open on both sides. The Costs card says so in as many words: all of these are already taken off the profit. A trade that would lose money after the withdrawal fee is not listed at all. PRO members can tap the (i) beside the profit to see every step.
On this LVVA opportunity the profit reads $4.56: $5.45 before the $0.89 fee. The fee is 0.97 LVVA, so you sell 0.97 fewer coins than you bought, and the calculation values those coins at the same average sale price. Every field on that screen, and what to distrust in each, is broken down in Understanding the opportunity details.
Two cases need your attention.
- A different network from the one named. The profit uses the first network listed. If you send on another, its fee is in the same withdrawal box: take the difference off the profit, or add it back if yours is cheaper.
- A fee we could not confirm. Some exchanges publish no withdrawal fee, and some publish a 0 on routes where every other venue charges, so a 0 counts as free only where we have checked it. When the fee is unknown, nothing is deducted: the Costs card reads "Not published, not deducted", the PRO calculation marks the line "not deducted" with a gold alert glyph, and the profit is before that fee. Check the fee on the sending exchange and take it off yourself.
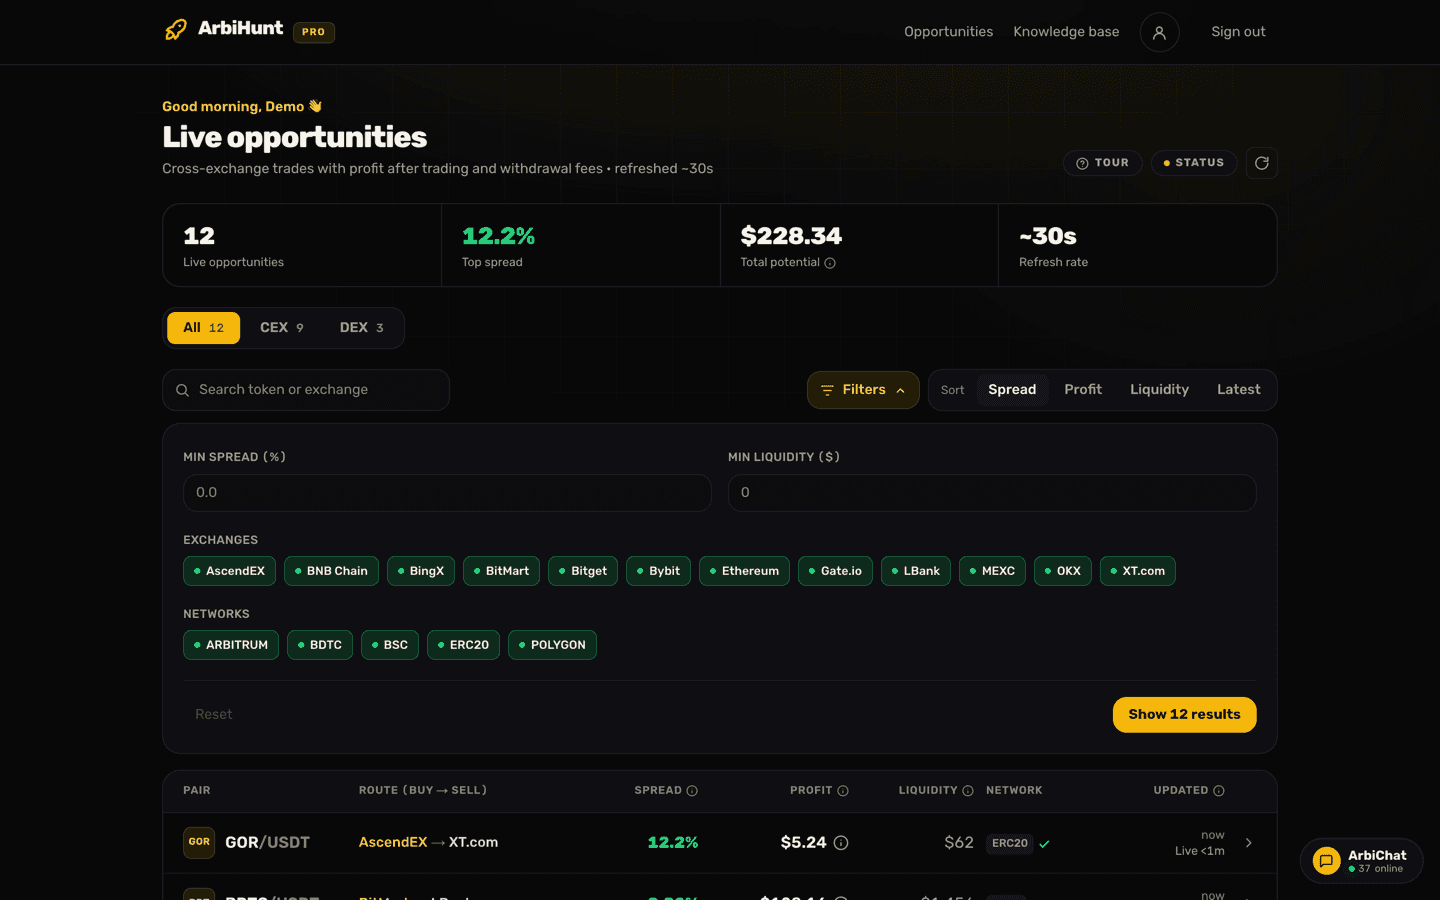
One difference worth knowing: the board shows the network name but not the fee. The Network column on the opportunities list gives you the chain the profit was worked out on, and the fee is already inside the Profit column beside it. The Spread column is the gap before any fee. The fee itself lives one tap deeper on the detail page. PRO filters include network chips, so you can switch off the chains you will not send on and stop seeing those rows at all.
Stop discovering the fee after you have bought
ArbiHunt scans 26 exchanges roughly every 30 seconds and takes the withdrawal fee and the taker fees on both legs off every profit before you commit to a single order.
Before you press withdraw
- Confirm the network is enabled for that coin on both sides: withdrawals on the sender, deposits on the receiver.
- Check the contract addresses match on both legs. A shared ticker proves nothing; migrated, wrapped and unrelated tokens share symbols all the time.
- Compare your intended size against the break-even for that route's flat fee. The profit on the board is measured at the size the books could take; a smaller trade still pays the whole fee. If your size does not clear it, the percentage is irrelevant.
- If the fee shows without a dollar figure, it was not deducted: look it up on the sending exchange rather than assuming zero, and take it off the profit yourself.
- Re-check the fee at the moment you withdraw. Exchanges change fee schedules without notice, and gas-driven fees move hour to hour.
One closing note on what this tool is. ArbiHunt finds, prices and ranks opportunities across 26 exchanges. It never connects to your exchange accounts, never asks for API keys, never holds funds and never places a trade. You do the transfer and both orders yourself, and every fee figure is a live snapshot that can change between the scan and your click. Arbitrage carries real risk and spreads close in seconds. This is information, not financial advice.
See it live
ArbiHunt scans 26 exchanges in real time and ranks every spread by true net profit, after fees, withdrawals and live liquidity.